Cost accounts help you to track activity costs, project expenses and earned value throughout the project life cycle. Cost accounts can be established in a hierarchy available to all projects in the enterprise project structure (EPS).

Overview:
You can create cost accounts that can be assigned to activities in any project. Further, you can also add expenses, assign expense categories and all the details relating to the expenses.
Firstly, create a cost account hierarchy, Go to Menu bar, choose Enterprise, then cost accounts. Click the Cost Account ID column label to display the cost accounts hierarchy.

Setting up a cost account:
Select the cost account immediately above and at the same level as the cost account you want to add, then click Add. Type the cost account’s ID and name and all other information relating to the cost account.
If in case, you wish to use the existing cost accounts, select the project in the top layout, go to project details in the bottom pane and go to defaults tab and in the cost account section, click the browse button and choose the desired cost account.
You can edit, delete the cost accounts by going to the Enterprise>>cost accounts section. You can as well cut/ copy/ paste cost accounts.


Adding Expenses:
Open the desired project for which you want to add expenses.

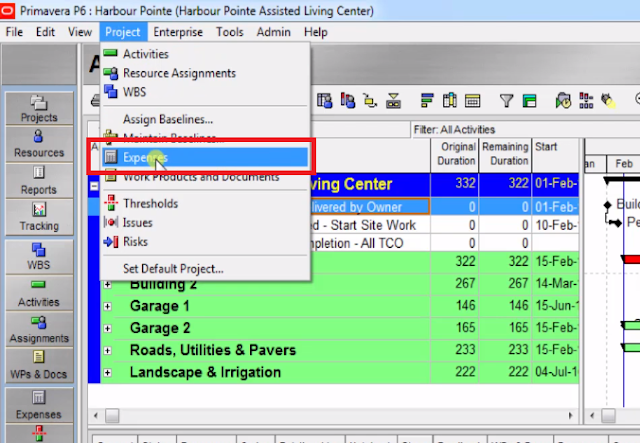
And then go to Menu bar, choose Project, Expenses to view the expenses tab.

click Add Select the activity that incurs the expense, then click the Select button

Click the General, Activity, Costs, and Description tabs, and enter the expense’s information

Assign an expense category: This type of categories enable you to classify the type of cost and can be used to group, sort, filter, and report the expense and cost information for your projects. In the General tab, then click the Browse button in the Expense Category field. Select the category you want to assign, then click the Select button.

To automatically calculate an expense’s actual cost based on the activity’s completion percentage, mark the Auto Compute Actuals checkbox. Then the module automatically updates the actual/remaining units when project actuals are applied.

Expense accrual type:
Select the expense whose accrual type you want to enter, then click the Activity tab.
Select one of the following accrual types:
■ Start of Activity, to accrue the entire expense on the date the activity begins
■ End of Activity, to accrue the entire expense on the date the activity ends
■ Uniform Over Activity, to evenly distribute the expense over the course of the activity’s duration

Use the General tab to define general information for the selected expense item, such as the item name and category.
Use the Costs tab to specify cost amounts for the selected expense item, including price/unit, budgeted or planned cost, actual cost, and remaining cost
Use the Description tab to enter a description of the selected expense item. You can type a new description. You can use HTML editing features like formatting text, inserting pictures, adding hyperlinks etc.

Analysis:
Comparing actual costs to budgeted values is the simple way to analyse your project status report. Measuring earned value involves three key indicators: planned value, earned value, and actual cost, which is the best way to measure the progress more accurately.
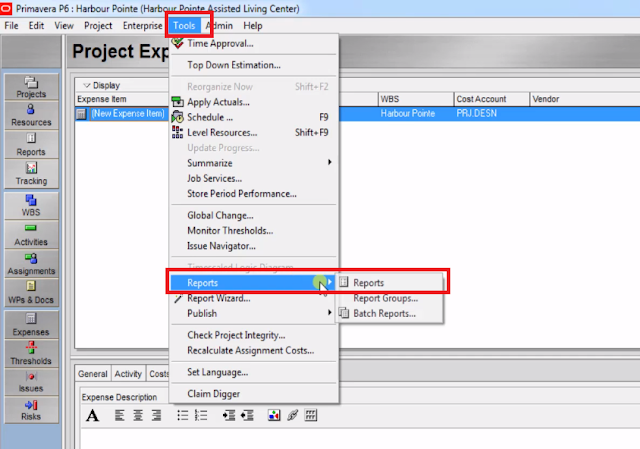
To Run the report wizard, go to menu bar, choose Tools>>Reports>> Reports

And then select a suitable report and then click on “Run Report”

The following is the sample report that has been produced using a sample project listing all the expenses of the project budgeted, actual spent and remaining costs. You can as well prepare many reports as per the requirement of the project.

Here is the detailed video tutorial for your better understanding:
If you liked this tutorial, share it with your friends. And also you can follow us on Youtube, Twitter and Facebook. We would love to hear from you, Please do comment, suggest or compliment our work and we shall make it better for you. You can write us at dptutorials15@gmail.com

Comments