The calendars define the number of available work hours in each calendar day. You can then create and assign calendars to each resource and each activity. The Primavera module uses your calendar for scheduling and tracking activities, and also leveling resources across your organization. You can link resource and project calendars to global calendars.
In this Chapter, let us learn how to add calendars and how to modify them.

Add Calendars:
You can create an unlimited number of calendars to accommodate different work patterns in your organization. You can create different calendars and assign the activities and resources in your projects to them.
Basically there are three calendar pools: Global, Resource, and Project.

The global calendar pool contains calendars that apply to all projects in the database.
The resource calendar pool is a pool of calendars for each resource.
The project calendar pool is a pool of calendars for each project in the organization.
You can assign either of the resource or global calendars to resources, and either of the global or project calendars to activities.
To Create Calendar:
Go to Menu bar, Choose Enterprise, Calendars. Choose Global, then click Add.


Select the calendar you want to copy for the new global calendar, then click the Select button

Type the new calendar’s name. To edit the new calendar, click Modify.

To view the calendar’s assignments before changing it, click Used By.


Follow the same procedure for adding the resource or project calendar. Only difference is that you must first open a project, when creating a project calendar.
Use more than one calendar when your projects contain activities that can occur on different schedules. The Primavera module schedules each activity only during the work times of the calendar to which it is assigned.

Modify Calendars:
To modify: Go to Menu Bar, Choose Enterprise, Calendars; choose the calendar type (Global, Resource, or Project), select the calendar you want to modify, then click Modify.
To change the number of hours in a specific workday, click the date you want to change and edit the work-hours /day.

To Specify default work hours:
In the calendar dialog box, click Workweek. Use the Calendar Weekly Hours dialog box to specify the number of default work hours for each week day in the open calendar.

If we edit the existing calendar and change the Saturday’s work hours as non-working, the color will be changed as shown in the below figure.

To Define default hours per time period:
In the calendar dialog box, click Time Periods and define the calendar's default number of hours per time period.

If you click the detailed work hours per day. You can either click to make the selected hour a work hour or click to make the selected hour a non-work hour.

You can set preferences to display time units in increments such as Hour, Day, Week, and Month. This can be done by going to Edit>>User Preferences…

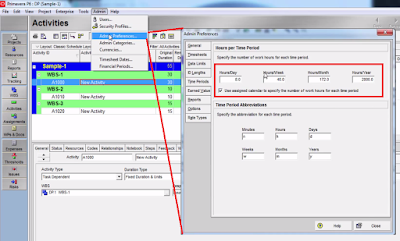
Administrators can define Hours per Time Period settings globally on the Admin Preferences, Time Periods tab, or they can specify that the Hours per Time Period settings should be defined per calendar.

Here is an Illustrative video tutorial of the same for better understanding:
If you liked this tutorial, share it with your friends. And also you can follow us on Youtube, Twitter and Facebook. We would love to hear from you, Please do comment, suggest or compliment our work and we shall make it better for you. You can write us at dptutorials15@gmail.com

Comments